Week 3 – Jeffrey Court Renovation Challenge
Disclosure: I was compensated with Jeffrey Court – HD tile selections for this renovation, but all opinions are my own.
Hey friends, welcome to week three of the Jeffrey Court Renovation Challenge.
It is hard to believe we are half way through this challenge.
This week we have been working on the to do list which includes repairs and prep work.
The weeks to do list
- replace insulation on the outside wall
- repair and replace the floor drain
- cement patch the hole around the drain
- install cement board
- replace the shower head and plumbing
- replace the shower control
- finish building out the stud that was partially missing
- create shower pan from mortar
- build shower curb
Prior to tackling the to do list, let’s look back at what we accomplished with the demo.

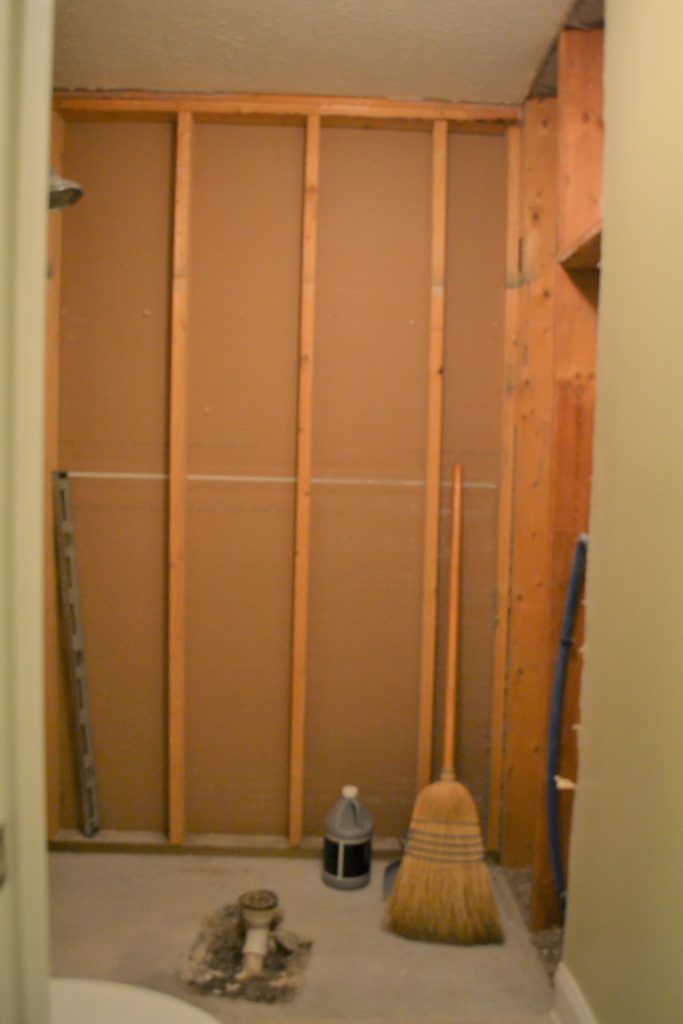
We were able to get the entire shower surround out without doing any damage to the existing tile floor but did over cut the sheet rock that was left, so that will have to be repaired.
Repairs
We began by reinforcing the studs that were cut during demo, and extending the short wall stud.
For that repair we were able to use one 2 x 6 (our stud size) cut down to nail to the cut studs to add support. Using the rest of that 2 x 6 to extend the short stud.
After we completed reinforcing the studs, we inserted R19 insulation for 2 x 6 in the right side exterior facing wall.

Plumbing repairs
After repairing the wall studs it was time to replace the broken floor drain. The drain had to be replaced in order to fit the new tile floor that will be installed.
This part of the renovation was new to us and we really had to take our time figuring this out.
We spent some time researching the best way to switch out the plumbing.
Ultimately deciding that it would be better to hire a professional for that part of the renovation.
Our home is on a slab and we did not want to create more damage from our inexperience in this area.
Hiring a plumber to switch out the plumbing was the best thing we could have done.
The plumber replaced the broken drain to install the proper drainage system that was necessary to fit a new tile floor.
Not only did he replace the drain, he filled in the hole that was surrounding the drain.
With the completion of the plumbing switch we were able to move onto installing the floors and walls.
Floor installation
Step one was to install the 2×4’s and a shower curb overlay to create the floor curb.

Step two was creating the new shower floor. To be honest this step made me very nervous.
I was nervous that we would mess up the floor and have to start all over.
Luckily these days you can google anything to find out how to do it.
With instructions and some assistance from a friend, we were ready.
Making sure that the first layer was lining the original concrete floor with vinyl membrane and putting cement board on top of that.
Being sure that everything was level prior to putting a layer of mortar.

With the shower floor complete it was time to let everything set.
After waiting a few days, we went back and were ready to install the walls.
Wall installation
Using three sheets of the mold resistant, low water absorbing cement board to make the walls.
We cut the pieces to fit all three walls, using roofing nails to secure them.
After getting the walls up, we used mesh tape to go over the seams.
Later we will cover those seams with thin-set to keep the tile from cracking.

Now the walls and floors are prepped and ready to go into the next phase.
The feeling of overwhelm is not as bad now that we have this part done.
At the end of the third week we are feeling pretty good with where we are in this renovation.
Next phase
Phase three of this renovation is gearing up and things will start to change dramatically.
Tile selections were delivered today so we are getting close to laying tile.
Eek!!! I can’t wait to open it up to see the tile for the first time in person.
Exciting and nerve racking, though I am certain we will love it.
I am excited to share the design plan for our master bathroom renovation next week.
Voting
Other exciting news, today you can begin voting for your favorite designer. I would appreciate your support in voting this week.
Be sure to go to Jeffrey Court Renovation Challenge to cast your vote.
Now, I have to go open some tile. See you next week for the 4th week of the challenge when I will share the design plan for the space.
Till next time
Xoxo
Sonya


Great job!
Thanks so much Susan
Wow Sonya, you are really making progress. Looking forward to the reveal!
We really have and are excited to get going with the work.
Looks like a hard job but know you can do a beautiful job. Watch that man on the ladder. Ha ha. Carol and lee.
It has not been too bad and thank you. I am definitely keeping an eye on him.
So exciting! Can’t wait to see the tile that your chose! I watched the re-cap. So fun to see you in it!
Hi Julie, I am excited to share the tile selections and get your thoughts on it. I just watched the recap myself, so exciting to see all the projects.
This is so exciting! Can’t wait to see the final space!
Hi Libbie, thanks so much for stopping by. I am excited to share it all with you. Be sure to come back this Wednesday to see the progress.