How to build faux DIY floating shelves without power tools
Have you been inspired by pinterest or instagram to build something but don’t own power tools? I am sharing how to build faux DIY floating shelves without power tools.
Until you realize you need power tools?
I am sharing how to build these DIY faux floating shelves without power tools.

I came across a project on my friend Liz’s Instagram feed I loved.
Feeling it would be a great fit for an underused pantry closet in our kitchen.
First I want to share with you a picture of her project.
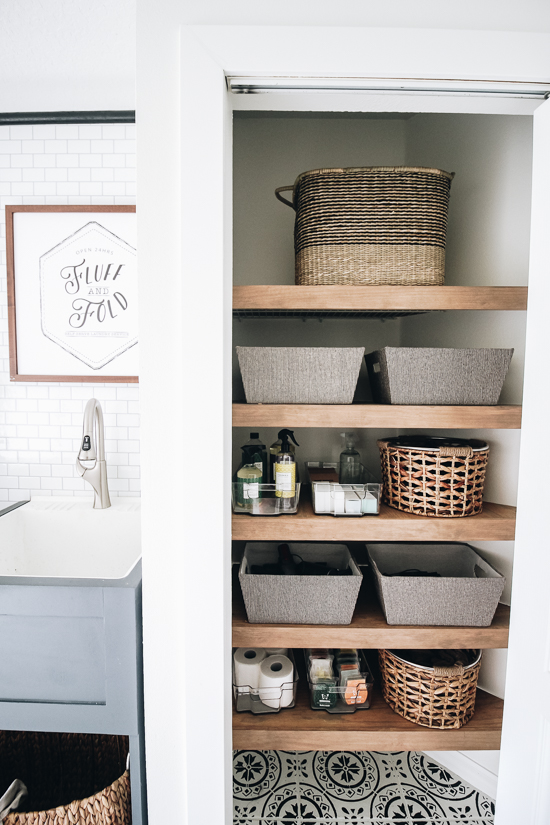
The closet makeover she did turned out amazing.
Liz does quite a bit of do it yourself projects in her home, so she has all the power tools necessary to build things.
She encourages others to try projects like this in their homes and this one was no different.
I was inspired by Liz to try this particular project in my home.
The one caveat, I do not own any power tools, nor do I know how to build things.
Not having any of my own power tools was not going to stop me from trying this diy, and it should not stop you from trying.
I felt pretty certain that I would be able to create this if I was creative.
Today I am sharing the process of how I created these faux floating shelves without my own power tools.
Prep work before building
I began with prepping my closet, removing all the stuff that was in it.
Next step was to remove the bi-fold door, the track on the floor and the top part of the frame.
In order for this to have the look of a recessed nook, the bi-fold doors will not be used again.
The holes were filled with wood filler and sanded in prep for painting.
I chose Benjamin Moore’s Dove White paint for the walls.

I measured each shelf individually to be sure they were all the same width and depth and wrote those down.
To be sure I had the correct measurements, I took a picture of the measuring tape with my phone.
Having a photo of the measuring tape ensured that I was getting the plywood cut to the correct measurements.
Items needed for the shelves
- 1 – sheet of 1/4 plywood
- 2 – 1/3 pieces of pine
- wood glue (to be stained or painted)
- small finish nails long enough to go through the 1/3 and into the 1/4 piece of plywood ( I used some we already had)
- stain or paint of your choice
- small hammer
Cutting the plywood
I do not own any cutting tools so I contacted my local home improvement store to inquire about cutting in store.
As long as it was not a busy time of day they were willing to do simple cuts of the plywood for me.
They were more than happy to accommodate me and made the cuts from one sheet of plywood.
Once the plywood was cut, it was time to figure out the 1/3 pine pieces.
My neighbor who restores furniture was kind enough to quickly cut the pine pieces for me.
If you are like me and have no power tools for this project here are a few options for you.
Options for cutting plywood
- have your local hardware store cut it, call before hand
- ask a friend or neighbor that has equipment to cut it for you
- rent the necessary equipment to complete the task
Building the shelves
Before building each shelf it is important to be sure the cut plywood fits by placing each piece on top of the wire shelves.

Once you are sure that each piece fits perfectly, it is time to put together the plywood and pieces of pine.
This is where it got a little tricky.
To create the look of a floating shelf , Liz used a router to make the pine and the plywood fit flush.
This created a professional looking finish to her shelves.
I did not have a router, so I came up with another way to put the pieces together to create the shelf.
At first I tried using wood glue and finishing nails to put the two pieces together on the raw edge of the plywood.
Unfortunately, that looked fine, but did not create a sturdy shelf.
Onto plan b, nail the plywood to the top of the 1/3 pine showing the raw edge of the sheet of plywood.

To paint or stain
Since I had to put them together that way, staining was no longer an option.
I filled the holes with wood filler and sanded them smooth.
At first I tried staining them but did not get the desired look I wanted.
From there I realized that painting the shelves was the best option.
It turns out that painting the shelves with black chalk paint was the perfect option.
Painting the shelves covered the imperfection of nailing them together and created a smooth finish.
Another added benefit to painting the shelves black was the nice color contrast to the white walls.

The black also offers a nice contrast to the various wood tones I have in the kitchen.
Without the power tools I was able to get the same project done with my twist on it.
Proof that you do not always need power tools for some do it yourself projects.
You may have to tweak the steps and colors a bit to fit your space and get the look you desire.
That is part of the fun of do it yourself projects.
Go here to see what i did with the leftover plywood I had.
Create these faux floating shelves in your home and share a picture, be sure to credit Liz for the inspiration of her original project.
Till then
Xoxo
Sonya

I love the black – great job…if only I had a junk closet to do♥️
Hi Jen, thank you so much. I had a lot of stuff to get rid of to make it pretty in this closet but I am really enjoying it.
Your floating shelves look great, Sonya! Love that the local big box hardware store will cut pieces for you! So, will these shelves no remain decorative? Was it a pantry before?
Hey Julie. thank you. I was excited to learn they would cut these for me, but I am now wanting to get my own tools for the next project. It was an old pantry and I had a larger pantry built on the other side of the wall so this will remain decorative.
Sonya! That’s genius. It looks amazing. I may have to steal this idea for my linen closet. Great job.
Angel, thank you so much for stopping by and for the compliment. This would be great for your linen closet. Let me know if you do it, I would love to see it.
LOVE this!!! I’ve really wanted “wood” shelves in my laundry room but I had these stupid wire shelves & had no idea what to do… OMG so glad I found this!! Thanks for sharing will be dong this very soon.
Thanks so much for stopping by Janay. Those wire shelves are the worst aren’t they. Hope you give this a try and share when you do.
This is great….can you tell me how you secured the wood to the wire shelf? Does the front get heavy given the weight of the 1/3 pine?
Lorry, thank you for stopping by. The plywood and pine piece just slides right over the original wood shelves. I have not found the front to be heavy, the entire shelf is pretty light weight.
This is such a great project! Love how it turned out!
Thank you so much Anne, it was a pretty easy project but such big payoff.
This looks great! Thanks for sharing. Upgrading my wire shelving is on my list of projects this year.
Thank you so much AnneMarie, it made the biggest difference in the kitchen area. That space as a pantry was not working moving our pantry and adding these shelves made much better use of the space.